about
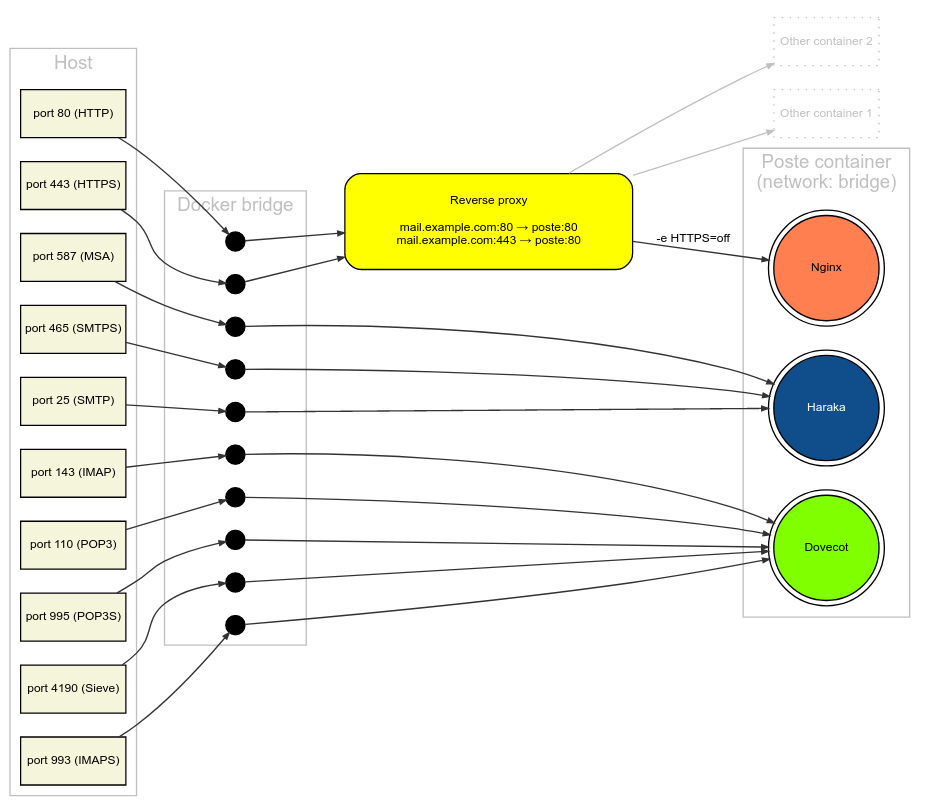
poste.io is an fully featured self hosted email server which you can deploy in few minutes (nearly). There’s no magic rocket science in a black box, poste.io consists of bullet proof resilient parts
basic setup
To easily deploy the mail server follow the documentation on the getting-started page or use an docker-compose template.
before you start
check that the following DNS dependencies are met:
- A & CNAME records for mail server - e.g.
mail.yourdomain.com - MX record for mail server
- TXT-SPF record for mail server - e.g.
v=spf1 mx ip4:YOUR_EXT_SERVER_IP -all. You can test it with an SPF-Tester - TXT-DMARC record for mail server - e.g.
v=DMARC1; p=none; rua=mailto:admin@YOUR_DOMAIN.COM; ruf=mailto:admin@YOUR_DOMAIN.COM. You can test it with an DMARC-Tester
the config
If you start with the gist-config maybe you stuck with the same problem like me.
I’m using an “frontend” nginx TLS proxy which handles the letsencrypt certificates in another docker container.
So i set up poste.io with external docker bridges 
the tls termination “problem”
At the first try poste.io started up & the proxy container requests the new letsencrypt certs & the https login to the mailserver worked out of the box. The problem was that i forgot to link the certs from the proxy to the mail server. So the other TLS ports stucks with an default self signed cert.

To link the certs from the proxy to poste.io attach the following lines to your docker-compose.yml:
...
    volumes:
      - NGINX_PROXY_PATH/ssl/certs/mail.YOUR_DOMAIN.com/key.pem:/data/ssl/server.key:ro
      - NGINX_PROXY_PATH/ssl/certs/mail.YOUR_DOMAIN.com/fullchain.pem:/data/ssl/ca.crt:ro
      - NGINX_PROXY_PATH/ssl/certs/mail.YOUR_DOMAIN.com/cert.pem:/data/ssl/server.crt:ro
...
the final config
version: '3'

services:
  mailserver:
    image: analogic/poste.io:2
#    container_name: mailserver
    restart: unless-stopped
    ports:
      - "25:25"
      - "110:110"
      - "143:143"
      - "465:465"
      - "587:587"
      - "993:993"
      - "995:995"
#      - "4190:4190"
    environment:
      - HTTPS=OFF
      - LETSENCRYPT_EMAIL=admin@YOUR_DOMAIN.com
      - LETSENCRYPT_HOST=mail.YOUR_DOMAIN.com
      - VIRTUAL_HOST=mail.YOUR_DOMAIN.com
    volumes:
      - /etc/localtime:/etc/localtime:ro
      - ./data:/data
      - NGINX_PROXY_PATH/ssl/html/.well-known:/opt/www/.well-known:ro
      - NGINX_PROXY_PATH/ssl/certs/mail.YOUR_DOMAIN.com/key.pem:/data/ssl/server.key:ro
      - NGINX_PROXY_PATH/ssl/certs/mail.YOUR_DOMAIN.com/fullchain.pem:/data/ssl/ca.crt:ro
      - NGINX_PROXY_PATH/ssl/certs/mail.YOUR_DOMAIN.com/cert.pem:/data/ssl/server.crt:ro
    networks:
      - frontend
      - default

networks:
  frontend:
    external:
      name: frontend_proxy
With this config the valid certs get linked from the nginx proxy to the mail server (which is pretty useful if you want to offer some TLS services).
do some testing
If you now fire up the compose file, the TLS ports should be reached externaly with the valid TLS certs:
# do some testing
HOST=mail.YOUR_DOMAIN.com
# test the SMTP port 587 with STARTTLS
echo | openssl s_client -servername $HOST -connect $HOST:587 -starttls smtp 2>/dev/null | openssl x509 -noout -issuer -subject -dates
# test the SMTPS, IMAPS & POP3S ports
for PORT in 465 993 995; do echo | openssl s_client -servername $HOST -connect $HOST:$PORT 2>/dev/null | openssl x509 -noout -issuer -subject -dates; done
security recommendations
(optional) set minimum TLS 1.2 for clients
If you use only modern clients you safely can force TLS 1.2 as minimum for clients
docker exec -it CONTAINER_NAME bash
sed -i 's#inbound_min_version\ =\ ""#inbound_min_version\ =\ TLSv1.2#g' /data/server.ini
sed -i 's#inbound_ciphers\ =\ ""#inbound_ciphers\ =\ ECDHE-ECDSA-AES128-GCM-SHA256:ECDHE-RSA-AES128-GCM-SHA256:ECDHE-ECDSA-AES256-GCM-SHA384:ECDHE-RSA-AES256-GCM-SHA384:ECDHE-ECDSA-CHACHA20-POLY1305:ECDHE-RSA-CHACHA20-POLY1305:DHE-RSA-AES128-GCM-SHA256:DHE-RSA-AES256-GCM-SHA384#g' /data/server.ini
exit
docker restart CONTAINER_NAME
(optional) configure DKIM keys
DKIM keys will increase security & avoid spamming. To enable DKIM keys got to “Virtual domains → your-domain.com” & click on create keys. This will auto generate your private keys and your DNS TXT public key entry which should look like this:
_sYEARMMDD000._domainkey.your-domain.com IN TXT "k=rsa;p=......

Add an appropriate TXT entry to your DNS config & test it with an DKIM-Tester. You also can trigger an full test with test emails => https://www.appmaildev.com/de/dkim
enjoy
